Spring 7장 고급 핵심 원리 - item 3: 프록시 패턴 및 데코레이터 패턴
예제
1. 인터페이스와 구현 클래스
(1) Controller
- 스프링 컨트롤러 인식
- 스프링 3.0 미만은
@Controller또는@RequestMapping이 있어야 스프링 컨트롤러로 인식함 - 스프링 컨트롤러로 인식해야, HTTL URL이 매핑되고 동작함
- 스프링 3.0 미만은
- @Controller 대신 @RequestMapping 사용 이유?
- 현재 예제에서는 수동 빈 등록을 하고싶은데, @Controller 안에는 내부적으로 @Component가 있어 자동으로 컴포넌트 스캔 대상이 되어버리기 때문
- 스프링부트 3.0 이상인 경우 @RequestMapping 대신
@RestController사용해야 함- 스프링 3.0 부터는 클래스 레벨에 @RequestMapping 붙여도 스프링 컨트롤러로 인식하지 않음
- 오직
@RestController와@Contorller만 스프링 컨트롤러로 인식함 - 컴포넌트 스캔 시작 위치도 변경해야 함!
@RequestMapping // 스프링 부트 3.0 이상인 경우 @RestController 사용해야 함
@ResponseBody
public interface OrderControllerV1 {
    @GetMapping("/v1/request")
    String request(@RequestParam("itemId") String itemId);
}

public class OrderControllerV1Impl implements OrderControllerV1 {

    private final OrderServiceV1 orderService;
    public OrderControllerV1Impl(OrderServiceV1 orderService) {
        this.orderService = orderService;
    }

    @Override
    public String request(String itemId) {
        orderService.orderItem(itemId);
        return "ok";
    }
}
(2) Service
public interface OrderServiceV1 {
    void orderItem(String itemId);
}

public class OrderServiceV1Impl implements OrderServiceV1 {

    private final OrderRepositoryV1 orderRepository;

    public OrderServiceV1Impl(OrderRepositoryV1 orderRepository) {
        this.orderRepository = orderRepository;
    }

    @Override
    public void orderItem(String itemId) {
        orderRepository.save(itemId);
    }
}
(3) Repository
public interface OrderRepositoryV1 {
    void save(String itemId);
}

public class OrderRepositoryV1Impl implements OrderRepositoryV1 {
    @Override
    public void save(String itemId) {
        if(itemId.equals("ex")){
            throw new IllegalStateException("예외 발생!");
        }
        sleep(1000);
    }
}
2. 스프링빈 수동 등록
(1) AppV1Config : 수동빈 등록 설정
@Configuration
public class AppV1Config {

    @Bean
    public OrderControllerV1 orderControllerV1() {
        return new OrderControllerV1Impl(orderServiceV1());
    }

    @Bean
    public OrderServiceV1 orderServiceV1() {
        return new OrderServiceV1Impl(orderRepositoryV1());
    }

    @Bean
    public OrderRepositoryV1 orderRepositoryV1() {
        return new OrderRepositoryV1Impl();
    }
}
(2) ProxyApplication
@Import(AppV1Config.class): AppV1Config 클래스를 스프링빈으로 등록함@SpringBootApplication- 컴포넌트 스캔을 시작할 위치를 지정함 (
@ComponentScan의 기능과 동일) - 해당 패키지와 그 하위 패키지를 컴포넌트 스캔함
- 설정하지 않으면, ProxyApplication이 있는 패키지와 그 하위 패키지를 스캔함
- 컴포넌트 스캔을 시작할 위치를 지정함 (
@Import(AppV1Config.class)
@SpringBootApplication(scanBasePackages = "hello.proxy.app")
// 스프링 부트 3.0 이상인 경우 : scanBasePackages = "hello.proxy.app.v3"
public class ProxyApplication {

    public static void main(String[] args) {
        SpringApplication.run(ProxyApplication.class, args);
    }
}
주의 : 컴포넌트 스캔 시작 위치
@Configuration이 붙은 수동빈 등록 설정 파일은 hello.proxy.config에 위치함
@Configuration은 내부에@Component를 포함하고 있어서 컴포넌트 스캔 대상이 됨즉, 컴포넌트 스캔에 의해 hello.proxy.config 위치의 설정 파일이 자동으로 스프링 빈 등록되지 않도록 컴포넌트 스캔 위치를 scanBasePackages = “hello.proxy.app”로 설정함
스프링 부트 3.0 이상인 경우
프록시 패턴 및 데코레이터 패턴
1. 요구사항 및 프록시 도입
- 요구사항 : 원본 코드 전혀 수정하지 않고, 로그 추적기 적용하기
- 프록시 도입 : Client → Proxy → Server

2. 프록시 기능
(1) 프록시 기능 비유
- 동생에게 사과 구입을 요청 했는데, 이미 집에 존재한다고 해주면 보다 빠르게 먹을 수 있음 (캐싱)
- 주유를 요청했는데 세차까지 하고 옴 (부가 기능 추가)
- 동생에게 사과 구입을 요청했는데, 동생은 또 다른 대리자에게 요청함 (프록시 체인)
(2) 객체에서 프록시 역할 : 대체 가능
- Client 입장에서는 요청이 처리되기만 하면 됨 (요청이 누구에 의해 처리되었는지 중요하지 않음)
- Client가 사용하는 Server 객체를 Proxy 객체로 변경해도 Client 코드 변경없이 동작해야 함
- 이를 위해서는 Proxy와 Server는 같은 인터페이스를 사용해야 함
- 런타임에 Client 객체에 DI를 사용해서 Client→ Server에서 Client→ Proxy로 객체 의존관계를 변경해도 Client 코드를 전혀 변경하지 않아도 됨
- 즉, DI를 사용하면 Client의 코드 변경 없이 유연하게 프록시 주입 가능 해짐
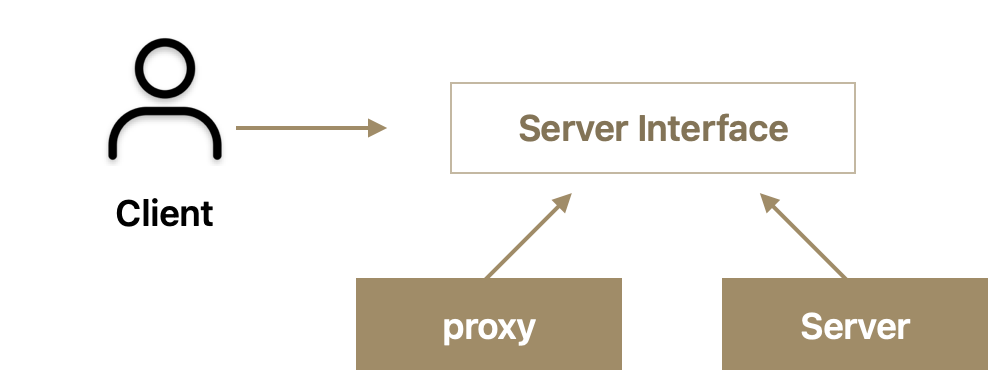
[ 구조 설명 ] Client는 ServerInterface에만 의존함 Server와 Proxy는 동일한 인터페이스 사용
3. 프록시 패턴 & 데코레이터 패턴
프록시 패턴과 데코레이터 패턴 비교
GOF 디자인 패턴 일종
2가지 모두 프록시 사용 방법이지만 의도에 따라 구분해서 사용함
프록시 주요 기능
프록시 패턴과 프록시는 다름
- 패턴 구조
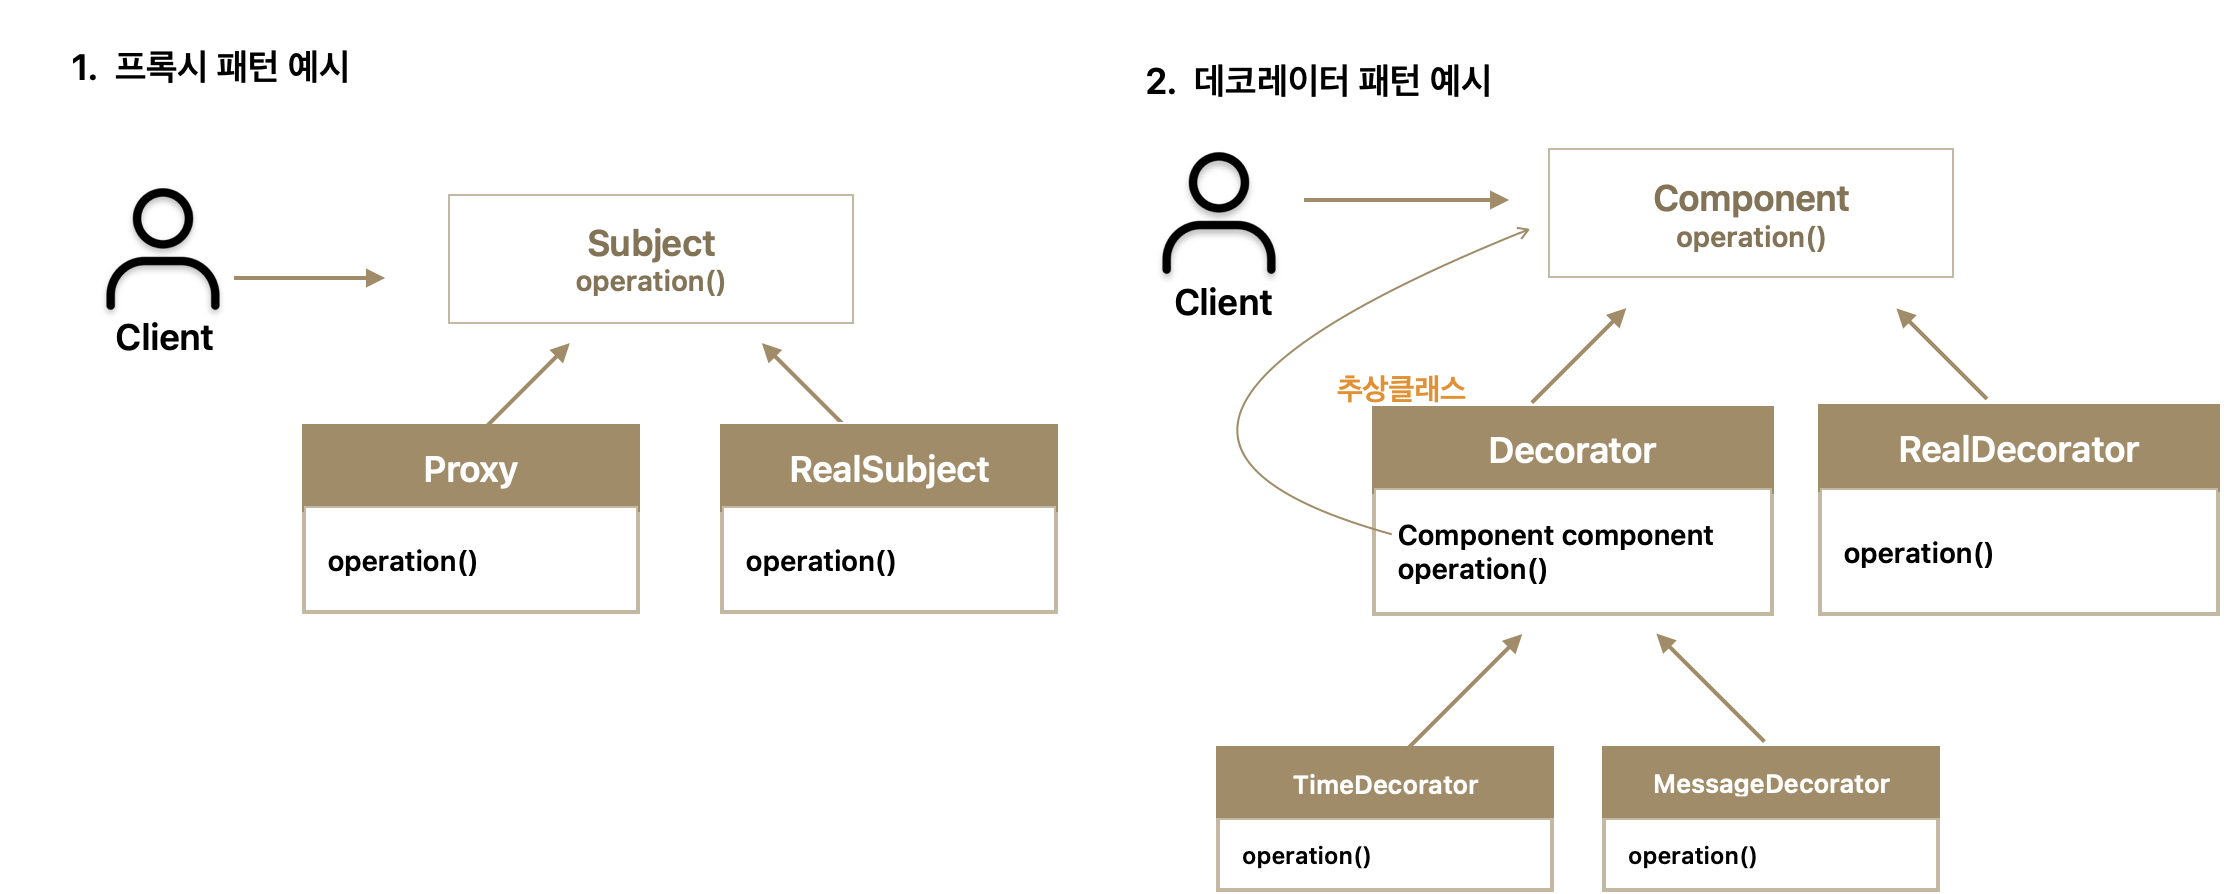
- 런타임 객체 의존 관계
- 프록시 패턴 적용 후 : client → proxy → realSubject
- 데코레이터 패턴 적용 후 : client → timeDecorator → messageDecorator → realComponent
- 프록시 패턴 핵심
- 프록시 패턴 의도 : 다른 개체에 대한 접근을 제어하기 위해 Proxy를 제공
- RealSubject(실제 객체) 코드와 Client 코드를 전혀 변경하지 않고, Proxy를 도입하여 접근 제어를 함
- Client 코드 변경 없이 자유롭게 Proxy를 넣고 뺄 수 있음
- 실제 Client 입장에서는 Proxy 객체가 주입되었는지, 실제 객체가 주입되었는지 알지 못함
- 데코레이터 패턴 핵심
- 데코레이터 패턴 의도 : 객체에 추가 책임(기능)을 동적으로 추가하고, 기능 확장을 위한 유연한 대안 제공
- 핵심 기능 호출하는데 프록시로 부가 기능을 추가적으로 호출함
- client → DecoratorA → DecoratorB → realComponent의 객체 의존관계를 만들고,
client.execute()를 호출함 - Decorator 역할
- 데코레이터는 꾸며주는 역할만 하므로 스스로 존재할 수 없고, 꾸며줄 대상인 Component가 반드시 필요함
- Decorator는 Component (프록시가 호출해야 하는 대상이자 실제 객체)를 내부에 갖고 있으며 항상 호출해야 함
4. 프록시 패턴 예제 : 접근제어(캐시)
(1) 프록시 객체를 통해 캐시 적용
- 한번 조회 후에 변하지 않는 데이터인 경우, 캐시해두고 이미 조회한 데이터를 사용하는 것이 성능상 좋음
- 프록시 주요 기능은 접근제어이며, 캐시도 접근 자체를 제어하는 기능 중 하나
- 이미 개발된 로직을 전혀 수정하지 않고, 프록시 객체를 통해 캐시 적용 예시
(2) 로직
- 처음 조회 이후에 캐시(cacheValue)에서 빠르게 데이터 조회하는 로직
Sbject 인터페이스: 단순히 operation() 메서드 하나만 갖고 있음RealSubject(실제 객체)와CacheProxy(프록시)는 Subject 인터페이스를 구현함
Subject target- Client가 Proxy를 호출하면 Proxy가 최종적으로 실제 객체를 호출해야 함
- 따라서 Proxy는 내부에서 실제 객체 참조를 갖고 있어야 함 (Proxy가 호출하는 대상을 target이라 함)
target.operation(): 처음 조회 이후에 캐시(cacheValue)에서 빠르게- cacheValue에 값이 존재하지 않으면, target(실제 객체)를 호출해서 값을 구함
- 구한 값을 cacheValue에 저장하고 반환
- cacheValue에 값이 존재했다면, target(실제 객체)를 호출하지 않고, 캐시 값을 그대로 반환
Subject 인터페이스 및 구현체 로직
public interface Sbject {
	String operation();
}
public class RealSubject implements Subject {
@Override
public String operation() {
log.info("실제 객체 호출");
sleep(1000); // 시스템에 큰 부하를 주는 데이터 조회라고 가정하기 위해 sleep
return "data";
}
}public class CacheProxy implements Subject {
private Subject target;
private String cacheValue;
public CacheProxy(Subject target) { // Proxy가 realSubject를 참조하도록 함
this.target = target;
}
@Override
public String operation() {
log.info("프록시 호출");
if( cacheValue == null ) {
cacheValue = target.operation(); // 실제 객체의 operation() 호출
}
return cacheValue;
}
}클라이언트 코드
- Subject 인터페이스에 의존하고 있으며, Subject를 호출하는 Client 코드
- execute() 실행하면,
subejct.operation()을 호출함
//  클라이언트 코드
public class ProxyPatternClient {
		private Subejct subject;
		public ProxyPatternClinet(Subject subject) {
				this.subejct = subject;
		}

		public void execute() {
				String result = subejct.operation();
				log.info("result={}", result);
		}
}
테스트 로직
-
realSubject와 cacheProxy를 생성하고, 둘을 연결함
-
cacheProxy가 realSubject를 참조하는 런타임 객체 의존관계가 완성됨
-
client에 realSubject가 아닌 cacheProxy 주입 (
new ProxyPatternClient(cacheProxy))public class ProxyPattern Test { @Test void cacheProxyTest() { Subject realSubejct = new RealSubject(); Subject cacheProxy = new CahceProxy(realSubject); ProxyPatternClient = new ProxyPatternClient(cacheProxy); client.execute(); // 실제 객체 호출 client.execute(); // 프록시 호출 } }
5. 데코레이터 패턴 예제
- 프록시를 통해 할 수 있는 기능은 크게 2가지 “접근제어”와 “부가 기능 추가”가 있음
- 데코레이터 패턴을 활용해서 프록시로 부가 기능을 추가해보자!
(1) 데코레이터 패턴 도입 전 코드
**Component 인터페이스 및 구현체**
// Component 인터페이스
public interface Component {
	String operation();
}
// Component 인터페이스를 구현한 RealComponent
public class RealComponent implements Component {
@Override
public String operation() {
log.info("RealComponent 실행");
return "data";
}
}클라이언트 코드
// 클라이언트 코드
public class DecoratorPatternClient {
		private Component component; // 인터페이스 Component에 의존함
		public DecoratorPatternClient(Component component) {
				this.component = component;
		}

		 // execute()실행하면 component.operation을 호출함
		public void execute() {
				component.operation();
		}
}
테스트 코드
- client → realComponent의 의존관계를 설정하고,
client.execute()를 호출함
public class DecoratorPatternTest {
	void noDecorator() {
		Component realComponent = new RealComponent();
		DecoratorPatternClient client = new DecoratorPatternClient(realComponent);
		client.execute();
	}
}
(2) 데코레이터 적용 코드
- 실행 시간 측정 및 응답값을 추가로 꾸며주는 부가 기능 추가
- 핵심 기능을 호출해야 하는데 여러 부가기능을 추가적으로 호출함
- Client가 timeDecorator를 호출하고, → timeDecorator가 messageDecorator 호출
- 응답값 꾸며주는 데코레이터
- Component 인터페이스를 구현한 MessageDecorator
- operation() 호출하면 프록시와 연결된 대상을 호출(
component.operation()) 하고, 그 응답 값을 추가로 꾸며준 다음 반환함
MessageDecorator 로직
public class MessageDecorator implements Component {
		private Component component; // 프록시가 호출해야 하는 대상 (실제 객체)
		public MessageDecorator(Component component) {
				this.component = component;
		}

		@Override
		public String operation() {
			String result = component.operation();
			String decoResult = "***"+result+"***"; // 응답값을 중간에 변형해줌
			return decoResult;
		}
}- 실행 시간 측정하는 데코레이터
TimeDecorator는 실행 시간을 측정하고, 로그로 남겨주는 부가기능 제공함
TimeDecorator 로직
public class TimeDecorator implements Component {
		private Component component; // 프록시가 호출해야 하는 대상 (실제 객체)
		public TimeDecorator(Component component) {
				this.component = component;
		}

		@Override
		public String operation() {
			long startTime = System.currentTimeMillis();
			String result = component.operation();
			long endTime = System.currentTimeMillis();
			long resultTime = endTime - startTime;
			log.info("resultTime={}ms"", resultTime);
			return result;
		}
}- 클라이언트 코드
- client → timeDecorator → messageDecorator → realComponent의 객체 의존관계를 만들고,
client.execute()를 호출함 - 실행결과
- TimeDecorator가 MessageDecorator를 실행하고 실행시간을 측정해 로그로 출력함
- MessageDecorator가 RealComponent를 호출하고 반환한 응답 메시지를 꾸며서 반환함
- client → timeDecorator → messageDecorator → realComponent의 객체 의존관계를 만들고,
클라이언트 코드 로직
// 클라이언트 코드
public class DecoratorPatternTest {
	void noDecorator() {
		Component realComponent = new RealComponent();
		DecoratorPatternClient client = new DecoratorPatternClient(realComponent);
		client.execute();
	}
	void decorator1() {
		Component realComponent = new RealComponent();
		Component messageDecorator = new MessageDecorator(realComponent);
		DecoratorPatternClient client = new DecoratorPatternClient(messageDecorator);
		client.execute();
	}
	void decorator2() {
		Component realComponent = new RealComponent();
		Component messageDecorator = new MessageDecorator(realComponent);
		Compoentn timeDecorator = new TimeDecorator(messageDecorator);
		DecoratorPatternClient client = new DecoratorPatternClient(timeDecorator);
		client.execute();
	}
}
(3) Decorator 중복 코드 제거 방법
- 기존 Decorator 코드들에는 일부 코드 중복이 있음
- 꾸며주는 역할을 하는 Decorator 들은 스스로 존재할 수 없기 때문에 항상 꾸며줄 대상이 있어야 함
- 따라서 내부에 호출 대상인 component를 갖고 있고, component를 항상 호출해야 함
- [ 중복 제거 해결 방법 ] component를 속성으로 갖고 있는 Decorator라는 추상 클래스를 생성함
로그 추적기 로직 : 프록시 적용
- Proxy를 사용하면 기존 코드를 전혀 수정하지 않고, 로그 추적 기능을 도입할 수 있음
- 기존 로그 추적기 로직에 Proxy를 적용해보자!
- 인터페이스와 구현체가 있을 경우 Proxy 적용 방법
- 인터페이스가 없는 구체 클래스에 Proxy 적용 방법
1. 인터페이스 기반 프록시
인터페이스와 구현체가 있는 App에 로그 추적용 프록시를 추가해보자
(1) 프록시 적용 의존관계
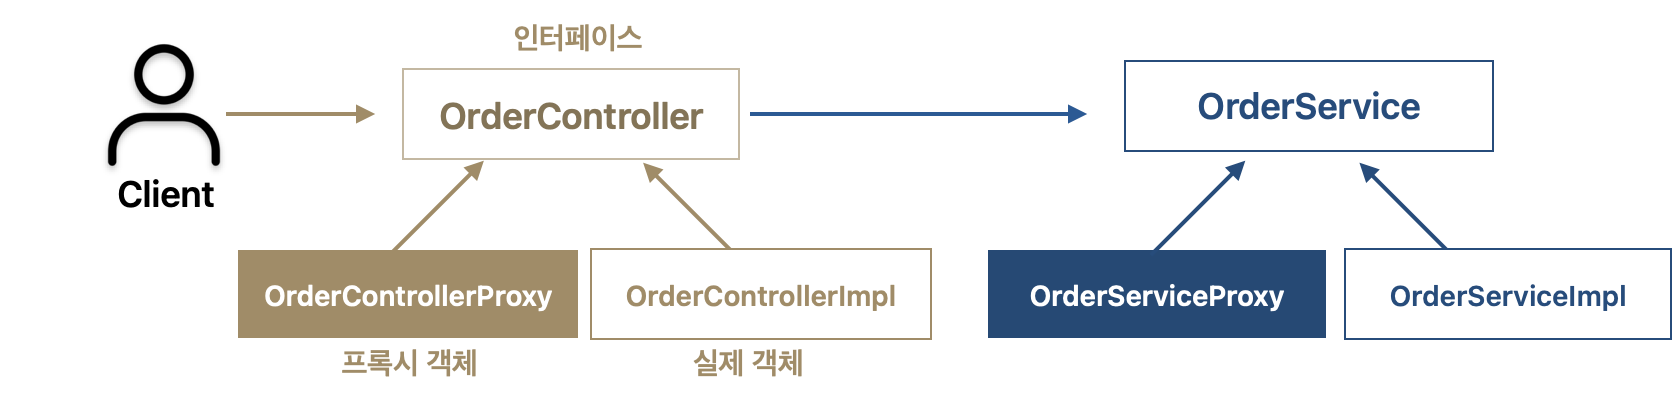
(2) 인터페이스가 있는 App에 프록시 적용 코드
- Controller, Service, Repository 프록시
- Proxy를 만들기 위해
인터페이스(OrderController)을 구현하고, 구현한 메서드에 LogTrace를 사용하는 로직을 추가함 (Service, Repository 동일) - 지금까지 실제 객체인 OrderControllerImpl에 로그 관련 로직을 모두 추가해야했지만, Proxy를 사용한 덕분에 로그 관련 로직을 대신 처리해줌
- 즉, OrderRepositoryImpl 코드를 변경하지 않아도 됨
OrderController target: 프록시가 실제 호출할 원본 컨트롤러의 참조를 갖고 있어야 함
- Proxy를 만들기 위해
Controller, Service, Repository 프록시 로직
@RequiredArgsConstructor
public class OrderControllerProxy implements OrderController {

    private final OrderController target;
    private final LogTrace logTrace;

    @Override
    public String request(String itemId) {
        TraceStatus status = null;
        try {
            status = logTrace.begin("OrderController.request()");
            String result = target.request(itemId); //target 호출
            logTrace.end(status);
            return result;
        } catch (Exception e) {
            logTrace.exception(status, e);
            throw e;
        }
    }
}
@RequiredArgsConstructor
public class OrderServiceProxy implements OrderService {

    private final OrderService target;
    private final LogTrace logTrace;

    @Override
    public void orderItem(String itemId) {
        TraceStatus status = logTrace.begin("OrderService.orderItem()");
        target.orderItem(itemId);
        logTrace.end(status);
    }
}
@RequiredArgsConstructor
public class OrderRepositoryProxy implements OrderRepository {

    private final OrderRepository target;
    private final LogTrace logTrace;

    @Override
    public void save(String itemId) {
        TraceStatus status = logTrace.begin("OrderRepository.save()");
        target.save(itemId); //target 호출
        logTrace.end(status);
   }
}
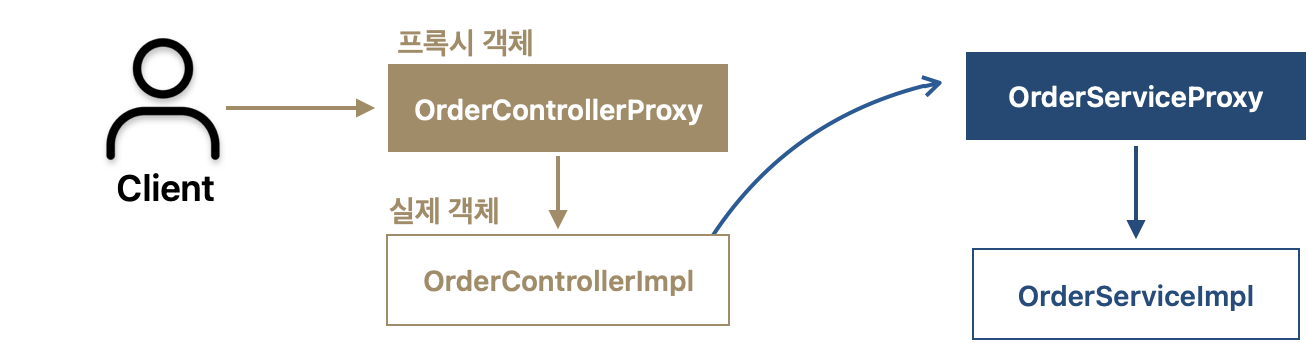
- 런타임 객체 의존관계 설정 : 프록시 객체 스프링빈 등록
- 스프링 컨테이너에 실제 객체가 아니라
프록시 객체를 스프링빈으로 등록, 관리함- 기존에는 스프링 빈이 orderControllerImpl, orderServiceImpl 같은
실제 객체를 반환했음 - 프록시를 사용하게 되면서 실제 객체는 스프링 빈으로 등록하지 않고, 대신에 프록시를 생성하고 프록시를 실제 스프링 빈 대신 등록함
- 기존에는 스프링 빈이 orderControllerImpl, orderServiceImpl 같은
- 실제 객체는 스프링 컨테이너와 상관 없이 자바 힙 메모리만 올라가며, 프록시 객체를 통해 참조될 뿐임
- 프록시는 내부에 실제 객체를 참조 하고 있음 (proxy → target)
- OrderServiceProxy는 내부에 실제 대상 객체인 OrderServiceImpl을 갖고 있음
- 스프링 빈으로 실제 객체 대신 프록시 객체를 등록했기 때문에 앞으로 스프링 빈을 주입받으면 프록시 객체가 주입됨 (프록시 객체는 스프링 컨테이너가 관리하고, 자바 힙 메모리에도 올라감)
- 프록시가 실제 객체를 참조하기 때문에 Proxy를 통해서 실제 객체를 호출 할 수 있음
- 스프링 컨테이너에 실제 객체가 아니라
InterfaceProxyConfig 로직
@Configuration
public class InterfaceProxyConfig {
    @Bean
    public OrderController orderController(LogTrace logTrace) {
        OrderControllerImpl controllerImpl = new OrderControllerImpl(orderService(logTrace));
        return new OrderControllerProxy(controllerImpl, logTrace);
    }

    @Bean
    public OrderService orderService(LogTrace logTrace) {
        OrderServiceImpl serviceImpl = new OrderServiceImpl(orderRepository(logTrace));
        return new OrderServiceProxy(serviceImpl, logTrace);
    }

    @Bean
    public OrderRepository orderRepository(LogTrace logTrace) {
        OrderRepositoryImpl repositoryImpl = new OrderRepositoryImpl();
        return new OrderRepositoryProxy(repositoryImpl, logTrace);
    }

}
ProxyApplication 로직
@Import(InterfaceProxyConfig.class)
@SpringBootApplication(scanBasePackages = "hello.proxy.app")
public class ProxyApplication {
    public static void main(String[] args) {
        SpringApplication.run(ProxyApplication.class, args);
    }

    @Bean
    public LogTrace logTrace() {
        return new ThreadLocalLogTrace();
    }
}
2. 구체클래스 기반 프록시
인터페이스가 없는 구체 클래스에 Proxy 적용 해보자
(1) 클래스 기반 프록시 도입
- 이전에는 인트페이스 기반 프록시를 도입함
- 자바의 다형성은 인터페이스나 클래스를 구분하지 않고 모두 적용됨
- 인터페이스를 구현하든, 아니면 클래스를 상속하든 상위 타입만 맞으면 다형성이 적용됨
- 인터페이스나 클래스를 구분하지 ㅇ낳고
- 즉, 인터페이스가 없어도 Proxy를 만들 수 있다는 의미
(2) 구체 클래스만 있는 로직에 프록시 적용 방법
- ConcreteLogic 클래스는 인터페이스 없고, 구체클래스만 존재함 → 여기에 Proxy 도입
- TimeProxy
- 시간을 측정하는 부가 기능을 제공하는 프록시임
- 인터페이스가 아닌 ConcreteLogic 클래스를 상속받아 프록시를 생성하였음
- ConcreteProxyTest 핵심
- ConcreteClient의 생성자에 concreteLogic이 아니라 timeProxy를 주입함
- ConcreteClient는 ConcreteLogic을 의존하는데, 다형성에 의해 ConcreteLogic에 concreteLogic과 timeProxy 둘 다 들어갈 수 있음! (TimeProxy가 ConcreteLogic을 상속받았기 때문)
// ConcreteLogic은 인터페이스 없고, 구체클래스만 있음
public class ConcreteLogic {
		public String operation() {
				log.info("ConcreteLogic 실행");
				return "data";
		}
}
@Slf4j
public class TimeProxy extends ConcreteLogic{
		private ConcreteLogic realLogic;
		public TimeProxy(ConcreateLogic realLogic) {
				this.realLogic = realLogic;
		}

		@Override
		public String operation() {
				long startTime = System.currentTimeMillis();
				String result = realLogic.operation();
				long endTime = System.currentTimeMillis();
				long resultTime = endTime - startTime;
				log.info("resultTime={}", resultTime);
				return result;
		}
}
public class ConcreteClient {
private ConcreteLogic concreteLogic; //ConcreteLogic과 TimeProxy 모두 주입 가능함
public ConcreteClient(ConcreteLogic concreteLogic) {
this.concreteLogic = concreteLogic;
}
public void execute() {
concreteLogic.operation();
}
}public class ConcreteProxyTest {
@Test
void addProxy() {
ConcreteLogic concreteLogic = new ConcreteLogic();
TimeProxy timeProxy = new TimeProxy(concreteLogic);
ConcreteClient client = new ConcreteClient(timeProxy);
client.execute();
}
}(3) 구체클래스 기반 프록시 예시
인터페이스 대신 구체 클래스를 기반으로 프록시 만든다는 것을 제외하고 동일함
Controller, Service, Repository 프록시 로직
- 인터페이스가 아니라 클래스를 상속받아서 Proxy를 만든다
super(null)호출 : 인터페이스 기반 프록시보다 클래스 기반 프록시의 단점에 해당됨- 자바에서 자식클래스를 생성할 때는 항상 super()로 부모 클래스의 생성자를 호출해야 함
- OrderServiceProxy를 생성하려면 super() 통해 부모클래스인 OrderService를 호출해야 함
- OrderControllerProxy를 생성하려면 suepr()를 통해 부모 클래스인 OrderController 호출 필요
- 현재 Proxy의 경우, 부모 객체 기능을 사용하지 않기 때문에 super(null)을 입력해도 됨
@RequiredArgsConstructor
public class OrderControllerProxy extends OrderController {

    private final OrderController target;
    private final LogTrace logTrace;

    @Override
    public String request(String itemId) {
        TraceStatus status = null;
        try {
            status = logTrace.begin("OrderController.request()");
            String result = target.request(itemId); //target 호출
            logTrace.end(status);
            return result;
        } catch (Exception e) {
            logTrace.exception(status, e);
            throw e;
        }
    }
}
@RequiredArgsConstructor
public class OrderServiceProxy extends OrderService {

    private final OrderService target;
    private final LogTrace logTrace;

    public OrderServiceProxy(OrderService target, LogTrace logTrace) {
		    super(null);
		    this.target = target;
		    this.logTrace = logTrace;
    }

    @Override
    public void orderItem(String itemId) {
        TraceStatus status = logTrace.begin("OrderService.orderItem()");
        target.orderItem(itemId);
        logTrace.end(status);
    }
}
@RequiredArgsConstructor
public class OrderRepositoryProxy extends OrderRepository {

    private final OrderRepository target;
    private final LogTrace logTrace;

    public OrderRepositoryProxy(OrderRepository target, LogTrace logTrace) {
		    this.target = target;
		    this.logTrace = logTrace;
    }

    @Override
    public void save(String itemId) {
        TraceStatus status = logTrace.begin("OrderRepository.save()");
        target.save(itemId); //target 호출
        logTrace.end(status);
   }
}
ConcreteProxyConfig 로직
@Configuration
public class ConcreteProxyConfig {
    @Bean
    public OrderController orderController(LogTrace logTrace) {
        OrderControllerImpl controllerImpl = new OrderControllerImpl(orderService(logTrace));
        return new OrderControllerProxy(controllerImpl, logTrace);
    }

    @Bean
    public OrderService orderService(LogTrace logTrace) {
        OrderServiceImpl serviceImpl = new OrderServiceImpl(orderRepository(logTrace));
        return new OrderServiceProxy(serviceImpl, logTrace);
    }

    @Bean
    public OrderRepository orderRepository(LogTrace logTrace) {
        OrderRepositoryImpl repositoryImpl = new OrderRepositoryImpl();
        return new OrderRepositoryProxy(repositoryImpl, logTrace);
    }

}
ProxyApplication 로직
@Import(ConcreteProxyConfig.class)
@SpringBootApplication(scanBasePackages = "hello.proxy.app")
public class ProxyApplication {
    public static void main(String[] args) {
        SpringApplication.run(ProxyApplication.class, args);
    }

    @Bean
    public LogTrace logTrace() {
        return new ThreadLocalLogTrace();
    }
}
3. 인터페이스 기반 프록시 VS 클래스 기반 프록시
- 프록시 통해 원본 코드 변경 없이 LogTrace 기능을 적용할 수 있게 됨
- 인터페이스 기반 프록시는 인터페이스만 같으면 모든 곳에 적용할 수 있지만, 클래스 기반 프록시는 해당 클래스에만 적용할 수 있음
- 클래스 기반 프록시는 상속 사용하기 때문에 몇가지 제약 있음
- 부모 클래스의 생성자를 호출해야 함 → super(null) 호출
- 클래스 final 키워드가 붙으면 상속이 불가능 해짐
- 메서드에 final 키워드가 붙으면 해당 메서드를 오버라이딩 할 수 없음
- 인터페이스 기반 프록시의 단점은 인터페이스가 필요하다는 그 자체임
- 반드시 인터페이스 도입하는게 좋은가?
- 이론적으로 모든 객체에 인터페이스 도입하여 역할과 구현을 나누는 것이 좋음!
- 하지만, 실무에서는 구현을 거의 변경할 일이 없는 클래스도 많음
- 인터페이스 도입하는 이유는 변경할 가능성이 있을 때 효과적인데 구현 변경할 가능성이 거의 없는 코드에 인터페이스 사용은 버거롭고 비실용적임
4. 프록시 적용 문제점 및 동적 프록시 기술 필요성
너무 많은 프록시 클래스
프록시 통해 기존 코드 변경없이 LogTrace(로그 추적기) 라는 부가기능 적용할 수 있게 됨문제는 프록시 클래스를 너무 많이 만들어야 한다는 점
프록시 클래스가 하는 일은 LogTrace 사용하는 것 뿐인데 프록시 클래스가 너무 많음
대상 클래스만 다를 뿐 내부 로직이 동일함 → OrderRepositoryProxy, OrderServiceProxy, OrderControllerProxy 3가지 모두 중복된 로직이 많음
대상 클래스가 1000개면 프록시 클래스도 1000개 만들어야 함프록시 클래 1개만 만들어서 모든 곳에 적용하는 방법은 없을까? → 동적 프록시 기술이 해결 방안