Spring 7장 고급 핵심 원리 - item 2: 템플릿 메서드 패턴 및 템플릿 콜백 패턴
템플릿 메서드 패턴
1. 이전 코드(V3) 문제
(1) 핵심기능과 부가기능 미분리
핵심기능과 부가기능 분리되지 못함
핵심 기능과 부가기능
핵심 기능과 부가기능이 분리되지 않고, 부가 기능 코드가 훨씬 많음
로그 추적기 도입 전(V0)
// V0 컨트롤러
@GetMapping("/V0/request")
public String request(String itemId) {
	orderService.orderItem(itemId);
	return "ok";
}

// V0 서비스
public void orderItem(String itemId){
	orderRepository.save(itemId)
}
로그 추적기 도입 후 (V3)
// V3 컨트롤러

@GetMapping("/v3/request")
public String request(String itemId){
	TraceStatus status = null;
	try {
		status = trace.begin("OrderController.request()");
		orderService.orderItem(itemId); // 핵심 기능
		trace.end(status);
	} catch(Exception e) {
		trace.exception(status, e);
		throw e;
	}
	return "ok";
}

// V3 서비스
public void orderItem(String itemId){
	TraceStatus status = null;
	try {
		status = trace.begin("OrderService.orderItem()");
		orderRepository.save(itemId)
		trace.end(status);
	} catch (Exception e) {
		trace.exception(status, e);
		throw e;
	}
}
(2) 동일한 패턴 분리
- 로그 추적기 사용하는 구조는 모두 동일하고, 핵심 기능 호출하는 부분만 다름
TraceStatus status = null;
	try {
		status = trace.begin("OrderService.orderItem()");
		// 핵심 기능 호출
		trace.end(status);
	} catch (Exception e) {
		trace.exception(status, e);
		throw e;
} - 문제 : 중복 코드만 별도의 메서드로 추출하면 될 것 같지만 어려움
- try~catch 구문이 존재함
- 핵심 기능 부분이 중간에 있어 단순히 메서드 추출이 어려움
- 해결 방안
변하는 것과변하지 않는 것분리해서 모듈화 하는 방안으로 템플릿 메서드 패턴 사용- 변하는 부분 : 핵심 기능 부분
- 변하지 않는 부분 : 부가 기능 관련 코드(로그 추적기 사용 부분)
2. 템플릿 메서드 패턴 (Template Method)
- 디자인 패턴 상세 : Untitled
템플릿 메소드 패턴이란
작업에서 **알고리즘의 골격(템플릿)**을 정의하고, 일부 단계를 하위 클래스로 연기함
템플릿 메서드 패턴은 다형성을 사용 해서 변하는 부분과 변하지 않는 부분을 분리하는 방법
이 패턴 사용시, 알고리즘 구조 변경 없이도 알고리즘의 특정 단계를 재정의할 수 있음
- AbstractTemplate (추상 템플릿)
- 변하지 않는 로직들을 모두 모아두고, 하나의 템플릿을 만들었음
- 템플릿 안에서 변하는 부분은 call() 메서드를 호출해서 처리함
- templateMethodV1 : 템플릿 메서드 패턴으로 구현한 코드 실행
- template1.execute()를 호출하면, 템플릿 로직인 AbstractTemplate.execute()를 실행
- AbstractTemplate.execute() 실행 중간에 call() 메서드 호출
- call() 메서드는 SubClassLogic1 에서 오버라이딩 되어 있음
- 즉, 현재 인스턴스인 SubClassLogic1 인스턴스의 SubClassLogic1.call() 메서드가 호출됨
public abstract class AbstractTemplate {
		// 변하지 않는 부분인 "시간측정 로직"을 몰아둠
		public void execute() {
				long startTime = System.currentTimeMillis();
				call();
				long endTime = System.currentTimeMillis();
				long resultTime = endTime - startTime;
				log.info("reusultTime = {}", resultTime);
		}

		protected abstract void call();
}
// 변하는 부분은 자식 클래스에 두고, 상속과 오버라이딩 사용해서 처리함
public class SubClassLogic1 extends AbstractTemplate {
@Override
protected void cal() {
log.info("비지니스 로직1 실행"); // 템플릿이 호출하는 대상인 call 메서드를 오버라이딩함
}
}
public class SubClassLogic2 extends AbstractTemplate {
@Override
protected void cal() {
log.info("비지니스 로직2 실행");
}
}@Test
void templateMethodV1() {
AbstractTemplate template1 = new SubClassLogic1();
tempalte1.execute();
AbstractTemplate template2 = new SubClassLogic2();
tempalte2.execute();
}3. 자식 클래스 생성 단점 해결: 익명 내부 클래스 활용
- 템플릿 메서드 패턴 단점 : SubClassLogic1, SubClassLogic2와 같이 클래스를 계속 생성해야 함
- 익명 내부 클래스 활용
- 클래스 계속 생성해야 하는 템플릿 메서드 패턴 단점 제거를 위해 익명 내부 클래스 사용
- 익명 내부 클래스 사용 하면 객체 인스턴스를 생성하면서 동시에 생성할 클래스를 상속받은 자식 클래스를 정의할 수 있음
- SubClassLogic1 처럼 직접 지정하는 이름이 없고, 클래스 내부에 선언되는 클래스여서 익명 내부 클래스라 함
- 익명 내부 클래스 예시
@Test
void templateMethodV1() {
		//AbstractTemplate template1 = new SubClassLogic1();대신 익명 내부클래스 활용
		AbstractTemplate template1 = new AbstractTemplate() {
				@Override
				protected void call() { log.info("비지니스 로직1 실행"); }
		};
		tempalte1.execute();

		//AbstractTemplate template2 = new SubClassLogic2();대신 익명 내부클래스 활용
		AbstractTemplate template2 = new AbstractTemplate() {
				@Override
				protected void call() { log.info("비지니스 로직2 실행"); }
		};
		tempalte2.execute();
}
4. 로그 추적기 로직 : 템플릿 메서드 패턴 적용
(1) AbstractTemplate
public abstract class AbstractTemplate<T> {
		private final LogTrace trace;

		// 객체 생성시 내부에서 사용할 LogTrace trace 전달 받음
		public AbstractTemplate(LogTrace trace) {
			this.trace = trace;
		}

		// <T> 제네릭 통해 반환 타입 정의
		public T execute(String message) {
				TraceStatus status = null;
				try {
						status = trace.begin(message);

						T result = call(); // 템플릿 코드 중간에 call 메소드 통해 변하는 부분 처리

						trace.end(status);
						return reuslt;
				} catch (Exception e) {
						trace.exception(status, e);
						throw e;
				}
		}

		// 변하는 부분을 처리하는 메소드이며, 이부분은 상속으로 구현해야 함
		protected abstract T call();
}
(2) OrderControllerV4
- AbstractTemplate
: 제네릭을 String으로 설정하여 AbstractTemplate의 반환타입은 String - 익명 내부 클래스 사용
- 객체를 생성하면서 AbstractTemplate를 상속받은 자식 클래스 정의함
- 별도 자식 클래스를 직접 만들지 않아도 됨
- template.execute() 호출
- template.execute() 호출하면 AbstractTemplate의 execute 호출됨
- AbstractTemplate의 execuete 메소드 중간에 호출된 call()은 자식 클래스의 call()이 호출됨
- 즉, 익명클래스에서 오버라이드한 call() 이 호출되게 됨
@RestController
@RequiredArgsConstructor
public class OrderControllerV4 {

    private final OrderServiceV4 orderService;
    private final LogTrace trace;

    @GetMapping("v4/request")
    public String request(String itemId){

        AbstractTemplate<String> template = new AbstractTemplate<>(trace) {
            @Override
            protected String call() {
                orderService.orderItem(itemId);
                return "ok";
            }
        };

        return template.execute("OrderController.request()");
    }
}
(3) OrderServiceV4 및 OrderRepositoryV4
@Service
@RequiredArgsConstructor
public class OrderServiceV4 {

    private final OrderRepositoryV4 orderRepository;
    private final LogTrace trace;

    public void orderItem(String itemId) {

        AbstractTemplate<Void> template = new AbstractTemplate<>(trace) {
            @Override
            protected Void call() {
                orderRepository.save(itemId);
                return null;
            }
        };
        template.execute("OrderService.orderItem()");
    }
}
@Repository
@RequiredArgsConstructor
public class OrderRepositoryV4 {

    private final LogTrace trace;

    public void save(String itemId) {
        AbstractTemplate<Void> template = new AbstractTemplate<>(trace) {
            @Override
            protected Void call() {
                sleep(1000);
                return null;
            }
        };
        template.execute("OrderRepository.save()");
    }
}
전략 패턴
1. 템플릿 메서드 패턴 단점 : 상속 구조 사용
템플릿 메서드 패턴 사용하기 위해서는 자식이 부모클래스 상속 받아야 함
자식 클래스와 부모 클래스가 컴파일 시점에 강하게 결합됨
자식 클래스를 작성할 때 부모 클래스 기능을 사용하지 않지만 상속받아야 함
→ 자식 입장에서는 부모 기능을 전혀 사용하지 않는데 부모 클래스를 알아야 함부모 클래스 수정하면, 자식 클래스에도 영향을 줌
→ 부모 클래스에 call2()가 추가되면, 자식 클래스 모두 call2() 추가해야 함익명 내부클래스 또는 별도 클래스를 생성해야 하는 부분도 복잡함
2. 상속 단점 해결 : 전략 패턴 사용
템플릿 메서드 패턴에서 상속 단점을 제거하기 위해 전략 패턴 사용
(1) 전략 패턴 과 템플릿 메서드 비교
| 템플릿 메서드 | 전략패턴 |
| 부모 클래스에 변하지 않는 템플릿을 둠 | 변하지 않는 부분을 Context에 둠 |
| 변하는 부분을 자식 클래스에 두어서 상속을 통해 해결 | 변하는 부분을 Strategy라는 인터페이스를 만들고, 해당 인터페이스를 구현하도록 함 |
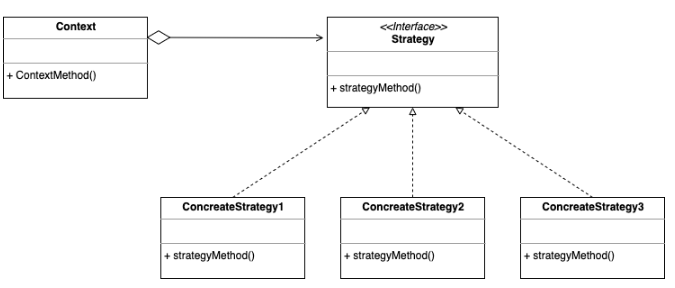
(2) 전략 패턴 예시
- Strategy
- Strategy 인터페이스는 변하는 알고리즘 역할을 함
- 변하는 알고리즘은 Strategy 인터페이스를 구현하면 됨 → StrategyLogic1, StrategyLogic2
public interface Strategy {
	void call();
}
public class StrategyLogic1 implements Strategy {
@Override
public void call() {
log.info("비지니스 로직 1 실행");
}
}
public class StrategyLogic2 implements Strategy {
@Override
public void call() {
log.info("비지니스 로직 2 실행");
}
}- Context
- ContextV1은 변하지 않는 로직을 갖고 있는 템플릿 역할을 하는 코드
- Context는 내부에 Strategy strategy 필드를 갖고 있음
- strategy 필드에
변하는 부분인 Strategy의 구현체를 주입하면 됨 - 전략 패턴의 핵심은 Context는 Strategy 인터페이스에만 의존한다는 점
public class ContextV1 { // 변하지 않는 부분은 Context
		private Strategy strategy; // 변하는 부분은 인터페이스 Strategy

		public ContextV1(Strategy strategy) {
				this.strategy = strategy;
		}

		public void execute() {
				long startTime = System.currentTimeMillis();
				strategy.call();
				long endTime = System.currentTimeMillis();
				long resultTime = endTime-startTime;
				log.info("resultTime={}", resultTime);
		}
}- 전략 패턴 사용 테스트
- 의존관계 주입을 통해 ContextV1에 Strategy의 구현체인 strategyLogic1을 주입
- Context에 원하는 전략을 주입하고,
context1.execute()를 호출하여 context를 실행함
@Test
void strategyV1() {
		Strategy strategyLogic1 = new StrategyLogic1();
		ContextV1 context1 = new ContextV1(strategyLogic1);
		context1.execute();

		Strategy strategyLogic2 = new StrategyLogic2();
		ContextV1 context2 = new ContextV1(strategyLogic2);
		context2.execute();
}
(3) 전략 패턴에 익명 내부 클래스 사용
@Test
void strategyV2() {
		//Strategy strategyLogic1 = new StrategyLogic1(); 대신 익명 내부 클래스 사용
		Strategy strategyLogic1 = new Strategy() {
				@Override
				public void call() {
						log.info("비지니스 로직 1 실행");
				}
		};
		ContextV1 context1 = new ContextV1(strategyLogic1);
		context1.execute();

		// strategyLogic2 생략
}
(4) 익명 내부 클래스 람다로 변경
- Java 8 부터
익명 내부클래스를람다로 변경 가능- 람다로 변경하려면, 인터페이스에 메서드가 단 1개만 있어야 함
- 현재, Startegy 인터페이스는 메서드가 1개만 있으므로 람다 사용 가능
@Test
void strategyV3() {
		ContextV1 context1 = new ContextV1(() -> log.info("비즈니스 로직1 실행"));
		context1.execute();

		ContextV1 context2 = new ContextV1(() -> log.info("비즈니스 로직2 실행"));
		context2.execute();
}
템플릿 콜백 패턴
1. 전략 패턴 고도화
전략 패턴 구현 방법 2가지
ContextV1 : 필드에 Strategy를 저장하는 방식
ContextV2: 파라미터에 Strategy 전달하는 방식 (템플릿 콜백 패턴)
(1) 선조립 후 실행 방식 단점 : 전략 변경 번거로움
- 기존 Strategy 전략의 선조립 후 실행방식
- Context의 내부 필드에 Strategy를 두고 사용함
- Context와 Strategy를 실행 전에 원하는 모양으로 조립해두고, 그 다음에 Context를 실행
- Context와 Strategy를 한번 조립하고 나면 이후 Context를 실행하기만 하면 되서 유용함
- 스프링도 유사 원리 : 애플리케이션 로딩 시점에 의존 관계 주입을 통해 필요한 의존관계를 모두 맺어두고 난 다음에 실제 요청을 처리하는 방식
- 이 방식의 단점 : Context와 Strategy를 조립한 이후에는 전략을 변경하기 번거로움
- Context에 setter를 제공해서 Strategy를 넘겨 받아 변경하면 되지만, Context를 싱글톤으로 사용할 때는 동시성 이슈 등 고려할 사항이 많음
- Strategy(전략)을 실시간으로 변경해야 한다면, Context를 하나 더 생성하고, 그곳에 다른 Strategy를 주입하는 것이 더 나을 수 있음
(2) 해결 방안 : 전략 주입 대신 직접 파라미터 전달
- Context 필드에 Stategy를 주입해서 사용하는 대신, 전략 실행시 직접 파라미터로 전달하는 방식 사용
- 해결 방안 적용한 ContextV2
- ContextV1과 다르게 ContextV2는 Strategy을 필드로 가지지 않음
- 대신 execute()가 호출될 때마다 항상 파라미터로 전략을 전달받음
public class ContextV2 {
		public void execute(Strategy strategy) {
				long startTime = System.currentTimeMillis();
				strategy.call();
				long endTime = System.currentTimeMillis();
				long resultTime = endTime-startTime;
				log.info("resultTime={}", resultTime);
		}
}- 전략 패턴 사용 테스트 : ContextV2 테스트
- Context와 Strategy를 “선조립후 실행” 방식이 아니라 Context 실행할 때마다 전략을 인수로 전달함
- 테스트 코드에서도 기존에 비해 Context를 하나만 생성하고, 하나의 Context에 실행 시점에 여러 전략을 인수로 전달해서 유연하게 실행하는 것을 확인 할 수 있음
//@Test
//void strategyV1() {
//		Strategy strategyLogic1 = new StrategyLogic1();
//		ContextV1 context1 = new ContextV1(strategyLogic1);
//		context1.execute();

//		Strategy strategyLogic2 = new StrategyLogic2();
//		ContextV1 context2 = new ContextV1(strategyLogic2);
//		context2.execute();
//}

@Test
void strategyV1() {
		ContextV2 context = new ContextV2();
		context.execute(new StrategyLogic1());
		context.execute(new StrategyLogic2());
}
(3) 추가 : 익명 내부 클래스 및 람다 적용
//@Test
//void strategyV2() {
//		Strategy strategyLogic1 = new Strategy() {
//				@Override
//				public void call() {
//						log.info("비지니스 로직 1 실행");
//				}
//		};
//		ContextV1 context1 = new ContextV1(strategyLogic1);
//		context1.execute();
//}

@Test
void strategyV2() {
		ContextV2 context = new ContextV2();
		context.execute(new  Strategy() {
				@Override
				public void call() {
						log.info("비지니스 로직 1 실행");
				}
		});
		context.execute(new  Strategy() {
				@Override
				public void call() {
						log.info("비지니스 로직 2 실행");
				}
		});
}
//@Test
//void strategyV3() {
// ContextV1 context1 = new ContextV1(() -> log.info("비즈니스 로직1 실행"));
// context1.execute();
// ContextV1 context2 = new ContextV1(() -> log.info("비즈니스 로직2 실행"));
// context2.execute();
//}
@Test
void strategyV3() {
ContextV2 context = new ContextV2();
context.execute(() -> log.info("비즈니스 로직1 실행"));
context.execute(() -> log.info("비즈니스 로직2 실행"));
}2. 템플릿 콜백 패턴
(1) 콜백(callback) 정의
- ContextV2는 변하지 않는 템플릿 역할을 하고, 변하는 부분은 파라미터로 넘어온 Strategy의 코드를 실행해서 처리함
- 즉, 다른 코드의 인수로서 넘겨주는 실행 가능한 코드를 **콜백(callback)**이라 함
- 프로그래밍에서
콜백(callback)또는콜 애프터 함수(call-after function)라 불림
(2) 템플릿 콜백 패턴
- 스프링에서는 ContextV2 같은 방식의 전략 패턴을
템플릿 콜백 패턴이라고 함- Context가 템플릿 역할을 하고, Strategy 부분이 콜백으로 넘오 온다 생각하면 됨
- 전략 패턴에서 템플릿과 콜백 부분이 강조된 패턴
- GOF 패턴은 아니고, 스프링 내부에서 자주 사용하다보니 스프링 안에서만 이렇게 부름
- 스프링에서 JdbcTemplate, RestTemplate, TransactionTemplate, RedisTemplate 처럼 다양한 템플릿 콜백 패턴이 사용됨
- 스프링에서 XxxTemplate으로 불린다면 템플릿 콜백 패턴이라고 생각하면 됨

3. 로그 추적기 로직 : 템플릿 콜백 패턴 적용
- 예시 : Callback 인터페이스, TimeLogTemplate
- Context→ Template 으로 변경
- Strategy → Callback 으로 변경
// 콜백 로직을 전달할 인터페이스
public interface Callback { //public interface Strategy {
	void call();
}

public class TimeLogTempalte { //public class ContextV2 {
		public void execute(Callback  callback) { //public void execute(Strategy strategy) {
				long startTime = System.currentTimeMillis();

				callback.call(); //strategy.call();

				long endTime = System.currentTimeMillis();
				long resultTime = endTime-startTime;
				log.info("resultTime={}", resultTime);
		}
}- [변경] TraceCallback 인터페이스
- 콜백을 전달하는 인터페이스
제네릭을 사용하여, 콜백의 반환타입을 정의함
public interface TraceCallback<T> {
		T call();
}
**기존 로그 추적기 로직 - 템플릿 메서드 패턴 적용**
public abstract class AbstractTemplate<T> {
		private final LogTrace trace;

		// 객체 생성시 내부에서 사용할 LogTrace trace 전달 받음
		public AbstractTemplate(LogTrace trace) {
			this.trace = trace;
		}

		// <T> 제네릭 통해 반환 타입 정의
		public T execute(String message) {
				TraceStatus status = null;
				try {
						status = trace.begin(message);

						T result = call(); // 템플릿 코드 중간에 call 메소드 통해 변하는 부분 처리

						trace.end(status);
						return reuslt;
				} catch (Exception e) {
						trace.exception(status, e);
						throw e;
				}
		}

		// 변하는 부분을 처리하는 메소드이며, 이부분은 상속으로 구현해야 함
		protected abstract T call();
}- [변경] TraceTemplate : 템플릿 역할
public class TraceTempalte {
		private final LogTrace trace;

		public TraceTempalte(LogTrace trace) {
			this.trace = trace;
		}

		// callback을 인수로 전달 받음
		public <T> T execute(String message, TraceCallback<T> callback) {
				TraceStatus status = null;
				try {
						status = trace.begin(message);

						T result = callbacㅏ.call();

						trace.end(status);
						return reuslt;
				} catch (Exception e) {
						trace.exception(status, e);
						throw e;
				}
		}

		// 변하는 부분을 처리하는 메소드이며, 이부분은 상속으로 구현해야 함
		protected abstract T call();
}
**기존 : OrderControllerV4**
@RestController
@RequiredArgsConstructor
public class OrderControllerV4 {

    private final OrderServiceV4 orderService;
    private final LogTrace trace;

    @GetMapping("v4/request")
    public String request(String itemId){

        AbstractTemplate<String> template = new AbstractTemplate<>(trace) {
            @Override
            protected String call() {
                orderService.orderItem(itemId);
                return "ok";
            }
        };

        return template.execute("OrderController.request()");
    }
}
- OrderControllerV5
template.execute(): 템플릿을 실행하면서 콜백을 전달함 (콜백으로 익명 내부 클래스 방식 사용)this.template = new TraceTemplate(trace)와 같이 생성자 만들면 좋은점?- OrderControllerV5 자체가 싱글톤이므로 new TraceTemplate(trace)도 한번만 호출됨
- 테스트시에도 TraceTemplate까지 모두 생성하지 않고, mock으로 만들어도 되므로 편리함
- 생성자 방식 대신 TraceTemplate를 처음부터 스프링빈으로 등록하고, 의존관계 주입 받아도 됨
@RestController
@RequiredArgsConstructor
public class OrderControllerV5 {

    private final OrderServiceV5 orderService;
    private final TraceTemplate template;

		// trace 의존관계 주입 받으면서 필요한 TraceTemplate 생성함
	  public OrderControllerV5(OrderServiceV5 service, LogTrace trace){
			  this.orderService = service;
			  this.template = new TraceTemplate(trace);
	  }

    @GetMapping("v5/request")
    public String request(String itemId){
		    // 콜백으로 익명 내부 클래스 방식 사용
				return template.execute("Controller.request()", new TraceCallback<>() {
						@Override
            public String call() {
                orderService.orderItem(itemId);
                return "ok";
            }
        };
    }
}
기존 : OrderServiceV4 및 OrderRepositoryV4
@Service
@RequiredArgsConstructor
public class OrderServiceV4 {

    private final OrderRepositoryV4 orderRepository;
    private final LogTrace trace;

    public void orderItem(String itemId) {

        AbstractTemplate<Void> template = new AbstractTemplate<>(trace) {
            @Override
            protected Void call() {
                orderRepository.save(itemId);
                return null;
            }
        };
        template.execute("OrderService.orderItem()");
    }
}

@Repository
@RequiredArgsConstructor
public class OrderRepositoryV4 {

    private final LogTrace trace;

    public void save(String itemId) {
        AbstractTemplate<Void> template = new AbstractTemplate<>(trace) {
            @Override
            protected Void call() {
                sleep(1000);
                return null;
            }
        };
        template.execute("OrderRepository.save()");
    }
}- OrderServiceV5 및 OrderRepositoryV5
template.execute(): 템플릿을 실행하면서 콜백을 전달함 (콜백으로 람다를 전달하는 방식)
@Service
public class OrderServiceV5 {

    private final OrderRepositoryV5 orderRepository;
    private final TraceTemplate template;

		public OrderServiceV5(OrderRepositoryV5 repository, LogTrace trace){
			  this.orderRepository = repository;
			  this.template = new TraceTemplate(trace);
	  }

    public void orderItem(String itemId) {
		    // 콜백으로 람다를 전달하는 방식
				template.execute("Service.orderItem()", () -> {
								orderRepository.save(itemId);
                return null;
        });
    }
}

@Repository
public class OrderRepositoryV5 {

    private final TraceTemplate template;
    public OrderRepositoryV5(LogTrace trace){
		    this.template = new TraceTemplate(trace);
    }

    public void save(String itemId) {
        	template.execute("Repository.save()", () -> {
								orderRepository.save(itemId);
                return null;
        });
    }
}
정리
- 핵심기능과 부가기능 분리되지 못한 문제 해결
- 템플릿 메서드 패턴, 전략 패턴, 템플릿 콜백 패턴을 적용
- 변하는 코드와 변하지 않는 코드를 분리 가능해짐
- 람다 사용해서 코드 사용 최소화 적용
- 한계 : 코드가 간소화되었지만 결국 로그 추적기를 적용하기 위해서는 원본 코드를 수정해야 함
- 원본 코드를 손대지 않고, 로그 추적기를 사용할 수 있는 방안 필요 → 프록시 사용